Generate dynamic videos
Video plays an important role in the work of every marketer, project manager, and business strategist. Countless studies show that video drives at least 50% more engagement than static images. Videos generate more shares, receive more attention from potential users or buyers, and bring you more sales.
Robolly introduces the most advanced software for dynamic video creation. With our newly introduced video generation tools and APIs you can generate dynamic animations, slideshows, and even complex videos efficiently at scale.
In this article:
- What type of videos can I dynamically generate using Robolly
- How to create a video template
- How to set up animations for my videos
- How to add a video element to my template
- How to control the duration of my Movie
- Can I add audio or background music to Movies
- More FAQs
- What video input and output formats are supported
- What is the maximum video resolution I can use as an input
- How many render credits does it consume to render videos
- Where to find free videos I could use for my templates
- What videos can I use for my Movies
- Can I use one template multiple times in one Movie
- What are the possible methods to render videos
- Can I render videos from Google Sheets
- Can I change the video frame rate
- What are the maximum dimensions of a video
What type of videos can I dynamically generate using Robolly
Other than static images and PDF files, you can now also programmatically create dynamic videos. Use Robolly’s easy-to-use API to generate videos for your social media, YouTube, presentations, and much more. Here are a few examples of what you can create with Robolly’s video generation API:
Example 1 - Create eye-catching animated one-clip videos from your static images
Bring your static images to life by adding eye-catching animations. Re-use your current templates or create a new one using the Robolly template editor.
How to create animated videos in bulk
-
Prepare your template. You can import it from the Template gallery, reuse your existing template, or create new one using the Template editor.
-
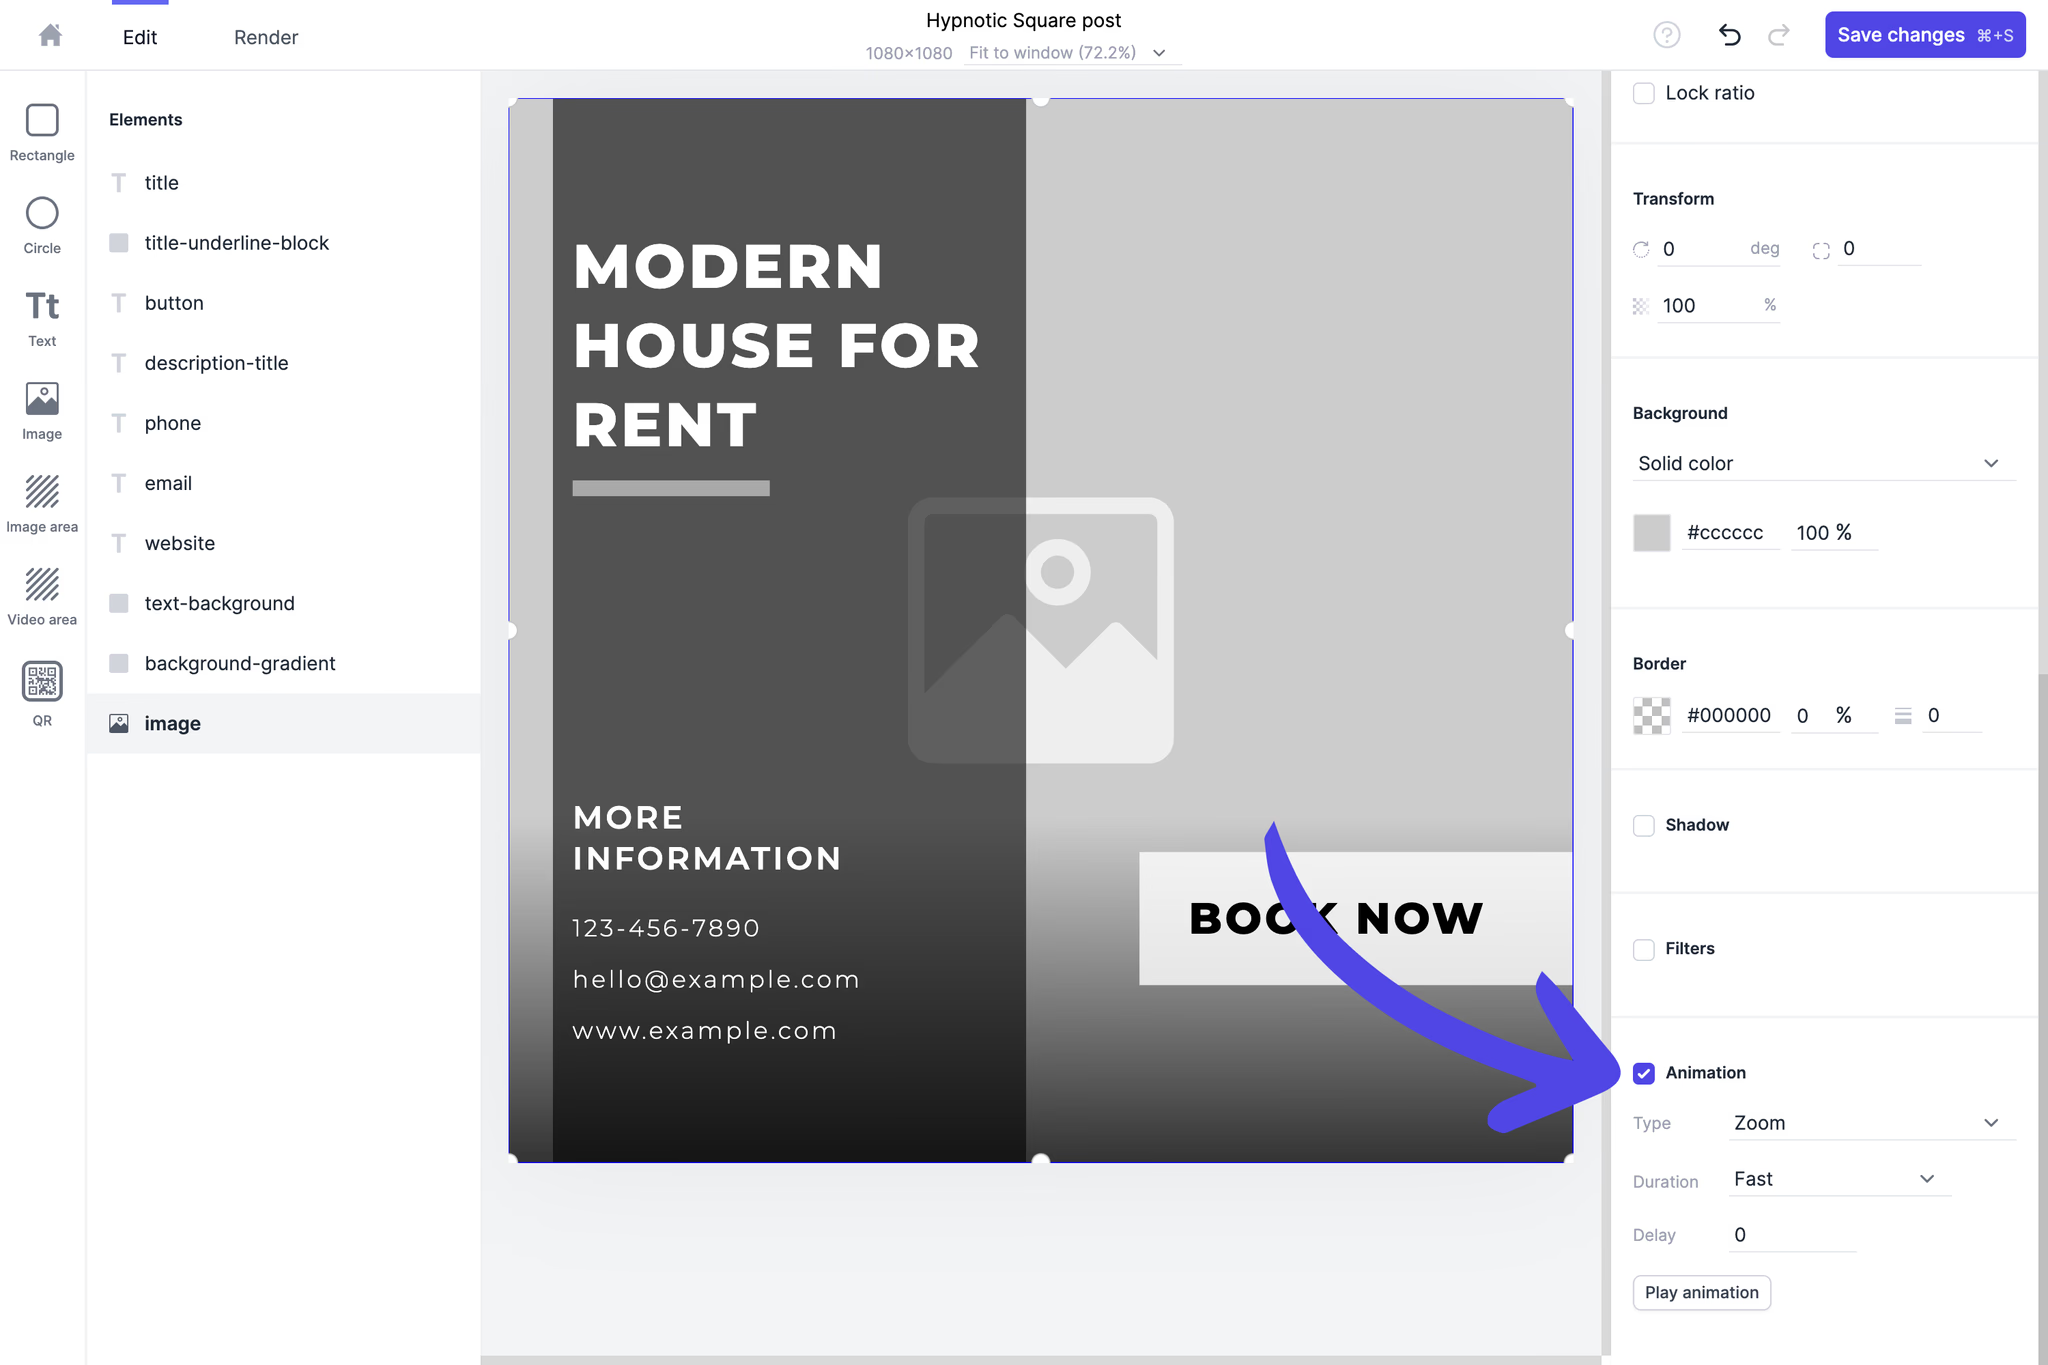
After you have your template prepared, select the element you want to animate.
-
Then, in the right panel of your Template editor scroll down to the Animation section to add an animation of your choice.
Note: For more information about how to set up animations and how animations work, read the How to set up animations for my videos section.
-
After that, the process is the same as with static images – to generate your video, switch over to the Render tab, select video format, fill in modifications, and hit the Render button.
-
As always, you can fully automate the process of creating your videos from your code or via automation tools like Zapier, Pabbly Connect, or similar.
Example 2 - Combine templates to generate slideshows and multi-clip videos
Do you have a multi-page information you want to present to your audience? Want to showcase multiple persons, things, events, news, reviews, or similar? You can easily bulk-create slideshows from your templates and present data in an attractive way without extensive manual work and hustle.
How to create multi-clip videos in bulk
-
Prepare your templates. You can import them from the Template gallery, reuse your existing templates, or create new ones using the Template editor.
TIP: Add animation of the whole template to create a nice transition between the slides.
-
To create a multi-clip video, navigate to the Movies tab in your Robolly dashboard.
-
Select the templates you want to add to your Movie.
Info: The output resolution of your final video is automatically set by the size of your template. All templates in the Movie have to be the same size.
-
In the left panel, order the templates and set default durations for each template.
-
Save your changes.
-
Now, in the Render your movie section fill in the modifications for each scene and click the Render button.
-
As always, you can fully automate the process of creating your videos from your code or via automation tools like Zapier, Pabbly Connect, or similar. TIP: When rendering via API you can access features like setting up custom template duration for each render, changing modifications in time, etc. Read API reference for more information.
Example 3 - Create advanced videos by combining static images, videos, animated graphics, and audio
Take your videos to the next level and create short movies. Robolly enables you to create professional-grade videos in a matter of a few clicks. Combine static images with videos, modify text in time, add background music, animate text, graphics, and more.
How to create a video template
In Robolly you don’t have to create separate templates for video.
You can easily add animations to your existing templates and create one-clip animated videos from them. For step-by-step guidance check the section How to create animated videos in bulk.
TIP: If you want to keep the original template, duplicate the template first and then make changes to the newly created duplicate. Organize your templates and use structured template naming for better management.
Or you can head over to the Movies section and generate slideshows or multi-clip videos from your existing templates. For step-by-step guidance check the section How to create multi-clip videos in bulk.
How to set up animations for my videos
Setting up animations for individual elements:
- Open your template in the Template editor.
- Select the element that you want to animate (shape, text, image, video).
- In the right panel, scroll down to the Animation section and turn on animation by clicking the checkbox.
- Configure the animation – select type and duration (fast, medium, slow), and optionally set up the delay for the animation (in milliseconds).
- To see how the animation will look, click the Play animation button.
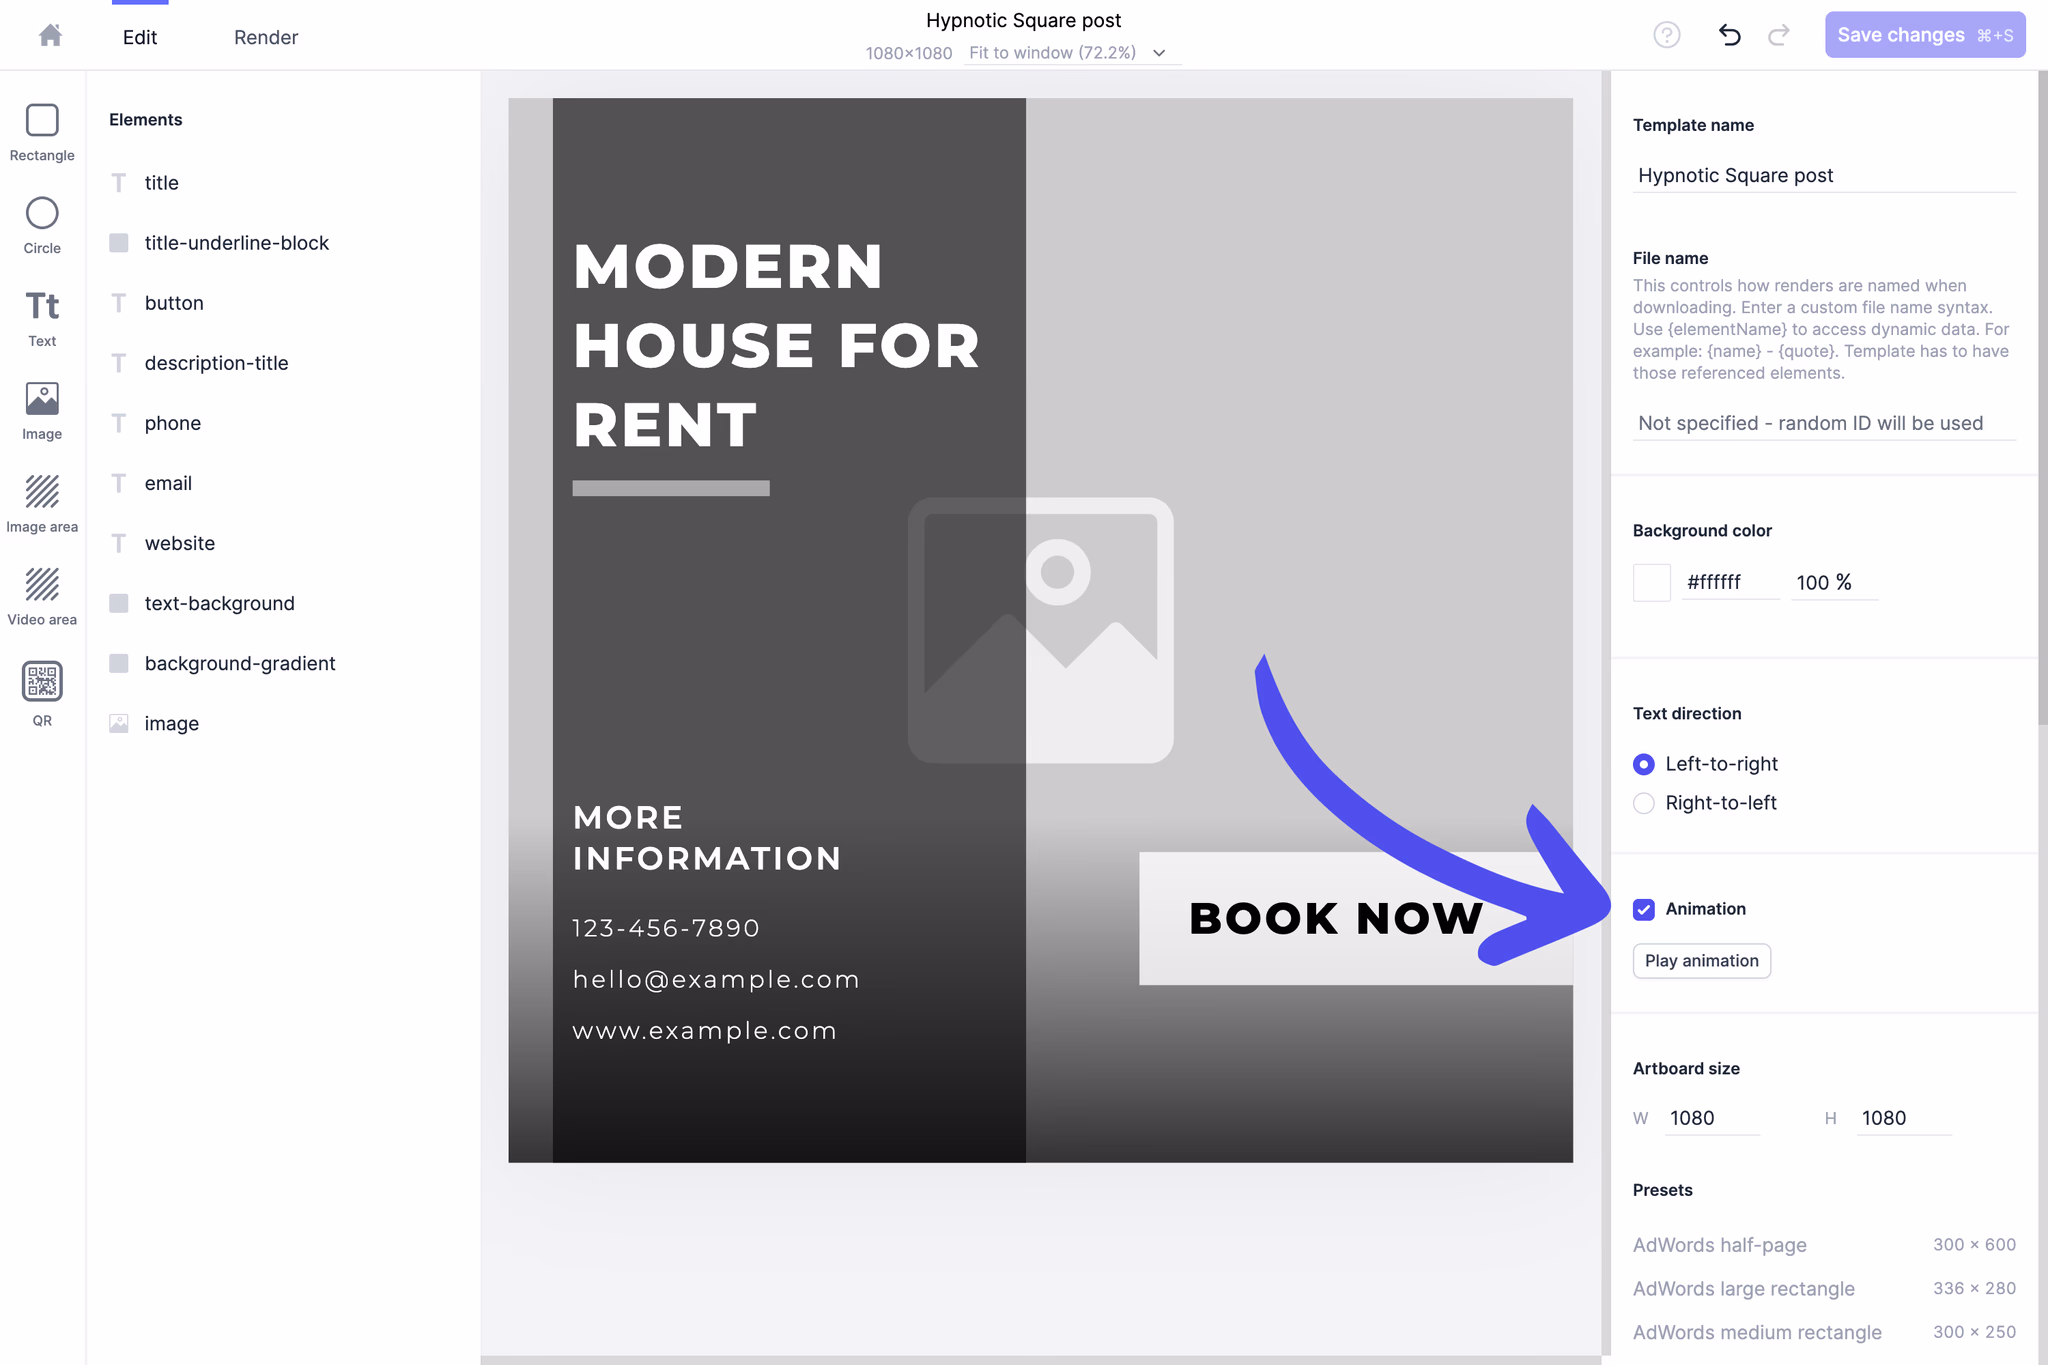
Setting up animations for the whole template:
- Open your template in the Template editor.
- In the right panel of the artboard setup, navigate to the Animation section.
- Turn on animations by clicking the checkbox. This will automatically create animations for all elements in the template. It is especially useful if you plan to use the template in a Movie and want to create a nice smooth transition between clips.
Info: If you use the template with animations in a Movie, Robolly will automatically create enter animations as well as exit animations to create smooth transitions between clips. You don’t have to configure the exit animation yourself.
Available animation types for image elements:
- Zoom
- Pan from top/right/bottom/left
- Reveal
- Opacity
- Move from top/right/bottom/left
- Rotate from right/left
Available animation types for text elements:
- Lettering (WARNING: does not work for text with conditional styling)
- Opacity
- Move from top/right/bottom/left
- Rotate from right/left
Available animation types for shapes:
- Opacity
- Reveal
- Move from top/right/bottom/left
- Rotate from right/left
How to add a video element to my template
Requirements: Advanced Movie with Video element add-on
- Create a new template (or import one from the Template gallery). If you have added the Video element to your plan, you will see in the left panel a video area icon.
- To add a video element to your template, simply click the video area icon. The video area works similarly to the image area – you can move it, resize it, set up auto-alignment, add filters, etc.
- When rendering the final video, simply insert the URL to your video source. Or when rendering via Robolly Dashboard, you can also select a video from the built-in gallery. Supported format for video input: MP4
How to control the duration of my Movie
Open your Movie. In the left panel, you have a preview of templates in the given Movie. Below every template name, you can set up the default duration of each template/clip.
This default duration can be overwritten with the duration parameter (in ms) when generating a Movie via API. You can copy-paste the code example for each Movie in the API integration tab.
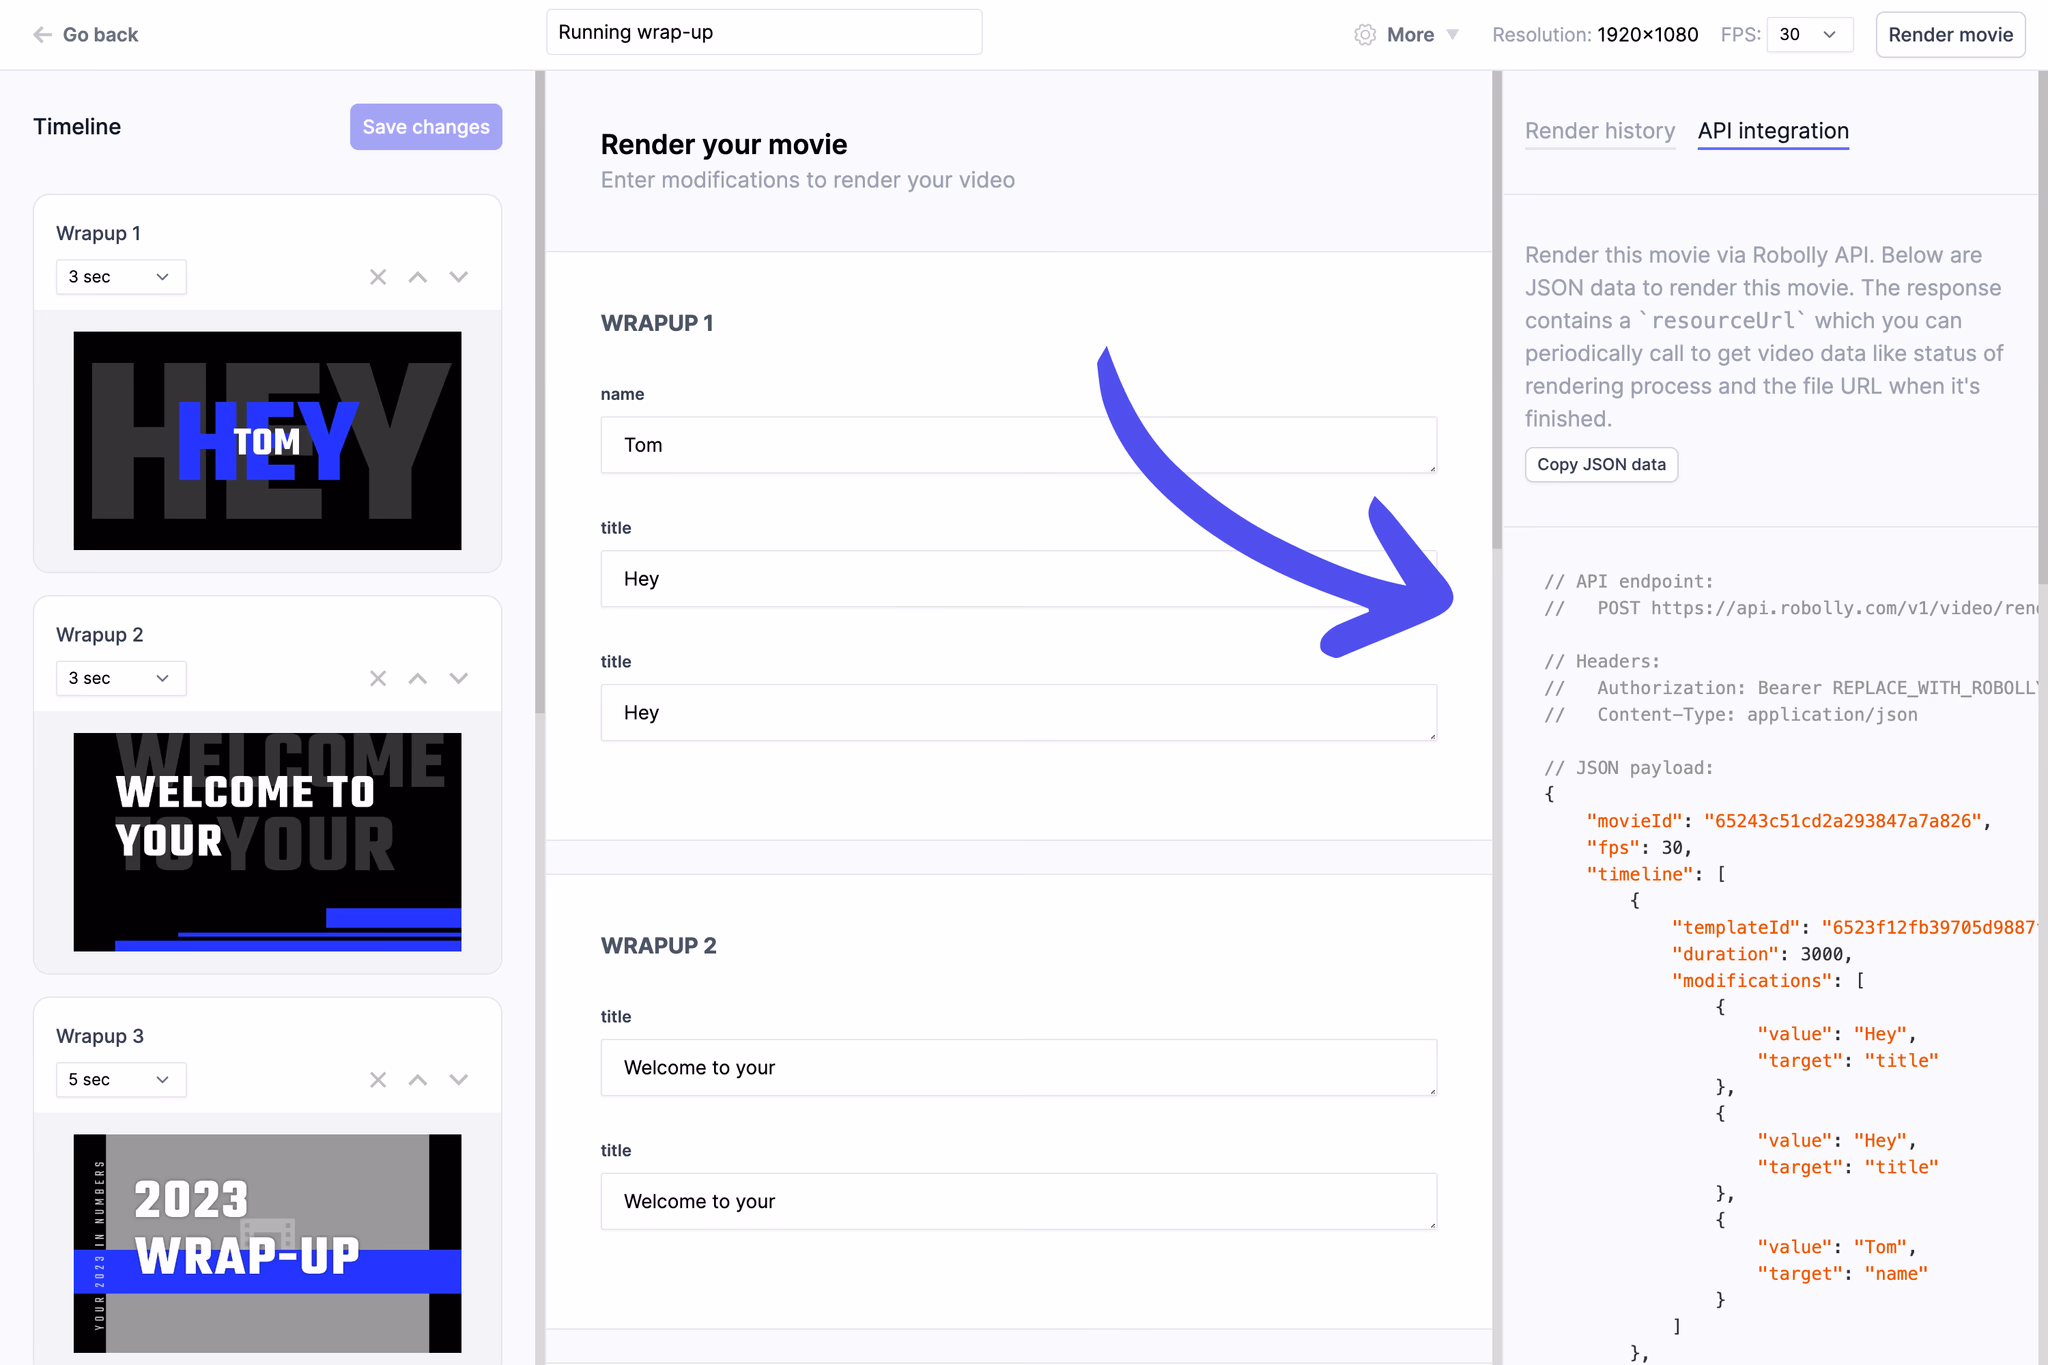
Tip: If you have configured an animation to your template, don’t forget to set up the duration of each clip appropriately so there is enough time for the animation to finish.
Can I add audio or background music to Movies
Yes! You can add audio or background music to your Movies using the audio parameter. Read API reference for more information.
More FAQs
What video input and output formats are supported
Robolly supports the MP4 format for both input and output.
What is the maximum video resolution I can use as an input
You can use videos with up to 1920 x 1920 px.
How many render credits does it consume to render videos
The render costs depend on each video. Generally, videos that require more computing power to generate (longer videos, higher FPS videos, etc) consume more render credits. In the Renders & Assets section, you can see the Render credit costs for each of your rendered videos. Also, for more information about render credits you can check this article.
Where to find free videos I could use for my templates
Robolly has a built-in directory of videos that you can use in your templates for free. If you are rendering from the Robolly Dashboard you can access the Video library by clicking the Select video button, then use the search input to find and choose a video you like. Works from both the Render tab of the Template editor and the Movie section of your Dashboard.
What videos can I use for my Movies
You can use any video in MP4 format with a resolution of up to 1920 x 1920 pixels. The link to the video must be a valid URL (the video file should be hosted on a server, be publicly accessible, and the link should point directly to the video file).
Can I use one template multiple times in one Movie
Yes, you can!
If you are rendering from your Robolly Dashboard, simply add the template to your movies multiple times:
- Open your Movie.
- In the left panel, click the Add template and select your template.
- Repeat the 2nd step to add the template multiple times.
- In the Render your movie section enter the modifications for each scene.
- Click the Render video button in the top right corner.
If you are rendering via API, you can either use the same approach as described above or you can use the template only once in your Movie and change the template modifications in time. Check API reference for more information.
What are the possible methods to render videos
- Render your videos from your Robolly Dashboard,
- Programmatically render videos (check API reference),
- Set up automated rendering via tools like Zapier, Pabbly Connect, or similar.
Can I render videos from Google Sheets
Yes, you can render single-clip and multi-clip animated videos from Google Sheets.
The process is as simple as it is with static images:
- Open your template and turn on Animation.
- Switch over to the Render mode.
- Use the Google Sheets setup wizard and copy the formula.
- Paste it to your Sheet and render videos.
For multi-clip videos:
- Open your template(s) and turn on Animation.
- Create a movie on the Movie page (and select your templates)
- Use the Google Sheets setup wizard (in the API integration) and copy the formula.
- Paste it to your Sheet and render multi-clip videos.
Can I change the video frame rate
Yes, you can change frame rate (FPS). To do so, open your Movie, in the top right corner select the desired frame rate, and click the Save changes button.
What are the maximum dimensions of a video
You can render videos with a maximum dimension of 1920 x 1920 pixels.